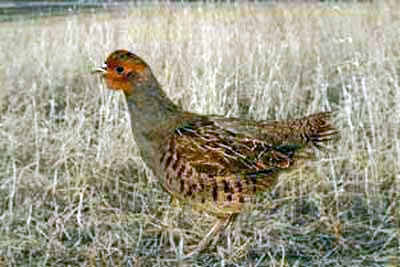
The Hungarian partridge is also known as a gray partridge, an English partridge, or simply called a "Hun". The Hun is a small bird with a short neck and tail and tends to be a little skittish, but quite beautiful. The juvenile Huns are pale brown with some darker streaks. As the birds mature, they develop a dark reddish patch on the belly, a brown back, and a chest with chestnut coloring on the flanks, and a reddish coloring on the face and throat.
At MacFarlane Pheasants, we buy our Hungarian Partridge eggs from France and hatch them in our own hatchery. High-end hunt clubs purchase our mature Huns, and this coming year we plan to have 6 hatches of 7,500 chicks each, totaling 45,000 mature Hungarian partridges.
Our Huns are kept separated from our pheasants. They require lots of attention and detailed care because of their small size. A baby chick is only about the size of a quarter! Two employees are responsible for growing the birds to maturity, but more employees are needed to help with such things as cleaning dishes every day and providing fresh drinkers and feeders. Assistance is also required for cleaning out or setting up rooms and "bitting" the Huns when they are about 4 weeks old. Bitting is a process that keeps the young partridges from picking their feathers or skin.
Heidi Welch, an experienced Hungarian partridge raiser at MacFarlane Pheasants, pays close attention to what each hatch likes or doesn't like to ensure they are doing well. We follow this philosophy with all of our birds because birds that are raised right grow up to be healthy birds! Heidi says she is constantly tweaking the Huns environment to provide the perfect conditions. Read on to learn about the rearing process:
Days 1 to 18
- We place new chicks on 28 tables (250-300 chicks per table) in our table room in the center of the barn. These tables are covered with wire mesh and plastic siding. We have an electric brooder over each table. We also place paper towel over the wire mesh because their tiny feet can fall through if we don't take this extra precaution.
- On day 3 we place 4-5 small feeders per table and 3-4 mason jar waterers. Each table's feeders are either orange or red. The feed is ground very fine, almost like powder. Feed is kept very fine for the first 12 days of life because it is critical to the viability of the chicks.
- We begin a transition on day 3 by adding a 1 gallon waterer and removing one mason jar. The chicks grow rapidly; by day two they have doubled in size.
- On day 4 we remove a divider that is on the table and add a feed trough. We also now add another gallon drinker and remove another mason jar drinker.
- Day 7 the chicks move to the A room. We move chicks off the tables and onto the floor in the A room. At this stage, they are big enough to jump off the tables!
- Drinkers are switched out every morning and topped off with water in the afternoon and during the night check.
- We bring 15 feeders from the tables and make sure the red and orange feeders go with the same group of chicks so they are not stressed by the change.
- We also place 5 feed troughs per section and place a medium feeder under the brooder light. We use 5-gallon waterers and 8 mini waterers. This year we tried nipple lines, using about 40-50 cups per section; they did so well that we are hoping to use them instead of mini drinkers in the future. Four mini drinkers come off one plasson with a rubber hose and a primer bulb.
- On day 10 and 11, we remove 1-gallon waterer per section and about 5 small feeders per section, as they empty.
- By day 12, we remove another gallon waterer per section, remove 5 small feeders per section, and add 1 medium feeder per section.
- Feed is made slightly courser from days 12 to 18.
- We remove one gallon waterer and add 1 medium feeder on day 13.
- We remove the last gallon waterer, lower one plasson bell waterer per section that does not have the minis attached, and add 1 medium feeder on day 14.
- On days 15 and 16, we begin removing 1 section of 4 minis per day, lower another plasson bell waterer, and add 1 medium feeder.
- All plasson bell waterers are lowered and we now have 5 to 6 medium feeders and all gallon waterers. Then the dividers are removed on day 17.
- On day 18, feed is no longer ground, and Huns eat a fine crumbled feed.
At 4 weeks of age the Huns are moved to the B room. We bring 10-12 medium feeders and stagger them near the large feeders. We don't change anything after the move for 3 days, and then we start to remove 3-5 medium feeders. We move the Huns outside at about 6 weeks. Huns are mature at 20 weeks.
The challenges to raising the Hungarian partridges are related to feeding, watering, and transitioning. Even though everything else might appear to be perfect, we can still lose partridges if the feed is not ground perfectly. These tiny birds can also drown in the small lip of a waterer, so we must be very careful about the system we use. Transitioning the birds from room to room is our biggest challenge because it causes a high level of stress. It is extremely important to have a strong eye on any gaps or cracks in the room where the birds are moving. If they become stressed, the birds will squeeze into the gaps. Temperature control is also important because the chicks will pile up if it is too cold and smother each other.